
|
⚠️ Cool Cure OG Units Only
This guide applies exclusively to the Cool Cure OG. Window tint is not applicable to the Cool Cure C, C+, or C2.
|
📹 Watch: Window Tint Installation Walkthrough
Prefer to follow along visually? This video walks through the full installation process step by step.
🔧 What You'll Need
Your tint film has already been trimmed to size at the factory. Gather the following before you begin:
- Window tint film (included or ordered separately)
- Spray bottle filled with water + 1–2 drops of liquid soap (do not shake)
- Window squeegee or credit card
- Window scraper or razor blade
- Standard household window cleaner
- Hair dryer (optional — for stubborn edges)
- Clean towel or lint-free cloth
|
📐 About Your Film
Your tint has been pre-cut to fit the Cool Cure OG door. You'll perform any final edge trimming after installation while the film is on the glass — not before. The side of the film that was touching the backing paper is the side that adheres to the glass.
|
🪟 Step-by-Step Installation
1. Read Before You StartRead this guide completely before handling the film. Once the film is wet and on the glass, you'll want to move confidently through the steps without stopping.
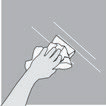
A clean surface is the most important factor in a bubble-free result. Use a window scraper to remove any hard residue or stuck-on materials from the glass door, then clean the entire surface thoroughly with household window cleaner. Dry completely.
|
💡 Tip
Even a small piece of debris under the film will create a permanent bubble. Take your time on this step — it's where most installation problems begin.
|
Before touching the film, wash your hands thoroughly. Oils and dirt from your hands can get trapped between the film and the glass during application, causing imperfections that can't be fixed after the film sets.
Set your spray bottle to a fine mist and thoroughly wet the entire glass surface. Wetter is better — a well-soaked surface lets the film float into position and makes it much easier to squeegee out air bubbles.

|
💧 Soap & Water Mix
Use 1–2 drops of liquid soap per bottle of water. Do not shake the bottle — you want a light solution, not foam. Foam under the film can create bubbles.
|
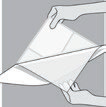
Peel the film completely away from the backing paper. The side that was touching the backing paper is the adhesive side — this goes against the glass. Place the film onto the wet glass and use the side of your hand to smooth out any large bubbles. The wet surface allows the film to "float," giving you time to slide it into its final position.
|
💡 Tip — Misaligned?
If the film isn't positioned correctly, simply peel it off, re-spray the glass, and reapply. The soap solution prevents the adhesive from setting immediately, so repositioning is easy while the glass is wet.
|
Once the film is in position, lightly mist the front of the film with your spray bottle, then use a window squeegee or credit card to push out all air bubbles. Work from the center of the film outward toward the edges — never from an edge inward, as this traps bubbles rather than releasing them.

|
💡 Tip — Stubborn Edges
If an edge of the film won't lie flat against the glass, use a hair dryer on a low heat setting to warm the film until it becomes pliable. Remove the heat and hold the edge firmly in place for 60–90 seconds until the film cools to room temperature.
|
✂️ Final Trim
Once the film is fully applied and all bubbles are removed, perform any final edge trimming with a razor blade or scraper while the film is still on the glass. Trim against the edge of the door frame for a clean, flush finish.
|
✂️ Trim After Installation Only
Do not trim the film before applying it to the glass. Final trimming on the glass surface ensures a precise fit and prevents the film from shifting during installation.
|
📋 Quick Reference
| Step | Key Action | Watch Out For |
|---|---|---|
| 1 — Prep glass | Scrape, clean, dry thoroughly | Any debris = permanent bubble |
| 2 — Wash hands | Clean hands before touching film | Oils transfer to adhesive side |
| 3 — Wet glass | Mist heavily with soap/water solution | Don't shake bottle — avoid foam |
| 4 — Apply film | Adhesive side to glass; float into position | Reposition before glass dries |
| 5 — Squeegee | Center outward; wet front of film first | Working edge-in traps bubbles |
| 6 — Trim | Final trim on glass with razor | Don't pre-trim before applying |